

Step by Step Ladybird Watercolour illustration

I was recently commissioned to do an entomological illustration of the Seven-spotted ladybird Coccinella septempunctata for a birthday gift.
Gathering reference
As always, the first step is to assemble your reference. I use as wide of a range of reference as I can; this decreases the chance of “copying” mistakes, and helps show the main features to highlight. With the ladybird, I’ve recently done a whole project illustrating different British species of ladybird, so had plenty of reference (and my own existing illustrations!) to work with.
There’s a youtube film that accompanies this blog which shows a time lapse film of the ladybird illustration.
Drawing up the pencil rough
Since Coleoptera are more or less symetrical (like most insects), you only need to draw up one side, then can flip and trace down the mirror image to get your picture. I draw up the insect in atonal pencil, I favour propelling pencils such as the Pentel P205, and draw direct onto the Fabriano hot press watercolour paper I’ll be painting on.
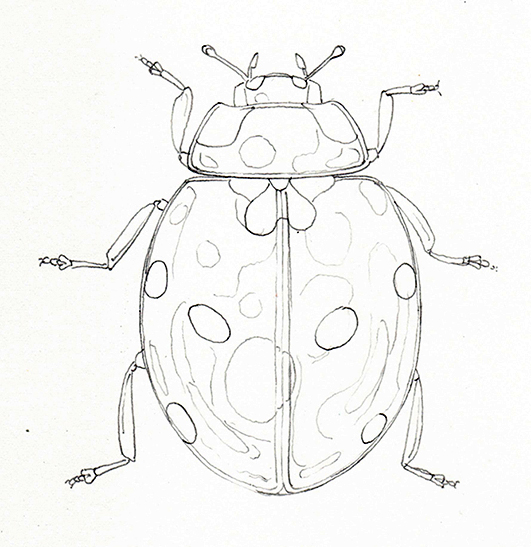
Pencil rough of the Ladybird; the lighter pencil lines are guides for the main areas of shine on the elytra (wing cases).
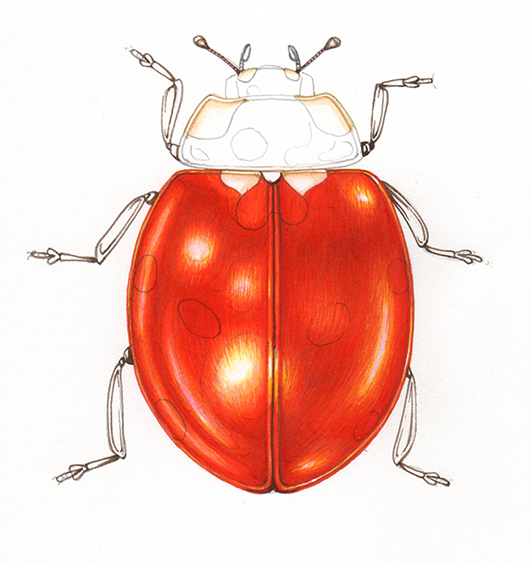
Putting on the base red colour…and making a scary decision
Using mainly Winsor and Newton watercolour paints (I like pans not tubes), I mixed up a mid-tone orange red. This included cadmium red, cadmium orange, gamboge yellow, and a tiny bot of crimson lake. Using Winsor and Newton series 7 brush (size 1) I began building up a thicket of tiny red brush strokes.
I’ve painted ladybirds before, and have left the black spots until later. This often results in a slightly strange looking insect, as if the spots are a separate part of the back rather than an instrinsic pattern on the wing cases. It was a scary decision, but I chose to paint the insect as if it was red all over its’ elytra, and to addd the balck spots once the tonal work was completed.
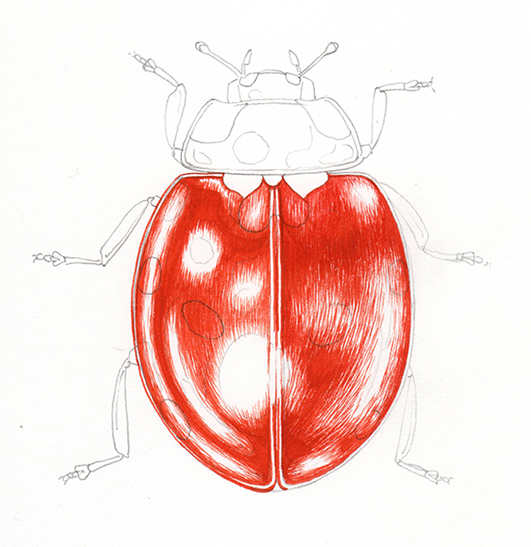
The elytra are shiny, and vivid in colour; it was important to leave areas of white to show the highlights, and to build the intense colour. Since I work by building up layers of colour with tiny strokes of the brush, there was always a risk that the wing cases would end up looking textured. This meant I had to use even smaller paintbrush strokes than usual.
Working into the shine
I mixed up an oranger red, and used the same technique of layers of tiny strokes to work towars the light areas of the ladybird. The main colours in this mix were cadmium orange and red, with a little cadmium yellow light thrown in. Not only did this colour creep into the highlighted area, but it also coveres the inital darker red area. This makes the insect smoother and the colour more intense.
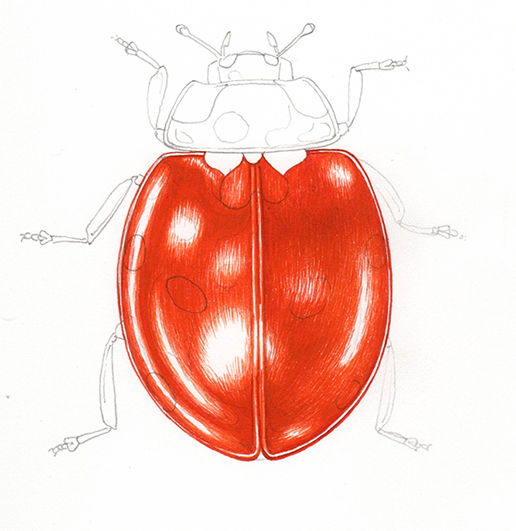
The next step was a further and lighter layer or colour. I chose to use quite a bit of yellow in this third mix as I was blending the areas of white paper (the highlights on the beetle) with the red. I used cadmium orange, and some yellow Doctor Martin’s Hydrous watercolour inks which are vivid, transparent, and colour-fast.
To make the ladybird shine, I had to make the darkest areas of red darker still. The colour mix this time was heavy on Alizarin crimson with cadmium red, and in some of the darkest shadows I mixed a little purple lake and vadyke brown in too.
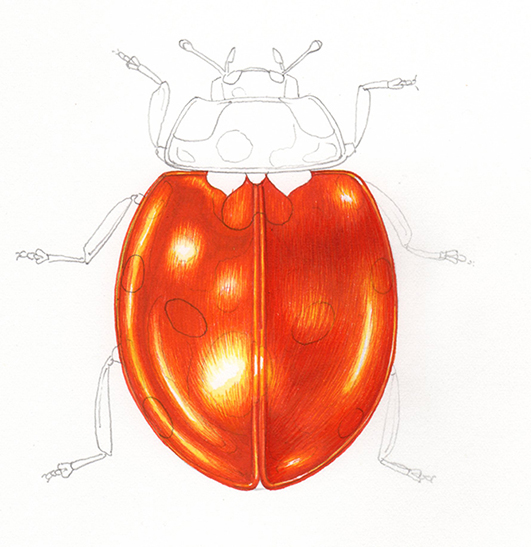
Painting the legs and the thorax
I also popped in the areas of white, using yellow ochre to delineate and blend them. I started work on the legs and antennae, using a dead ladybird I found a while back on a window sill for reference. By looking at the legs and feet (tarsi) under a dissecting microscope you can get a better idea of their form and funtion. The ladybird legs were not, as I’d initially thought, glossy black, but a warmish brown and ochre.
I plotted in the midline of the beetle’s wing cases – this is terrifying as the slightest blip or unsteadyness of hand is glaringly obvious. You can see where I made a mistake doing this line, directly above the lower shine.
I worked more into the legs, ensuring I echoed some of the red from the wings in the mix (vandyke brown, lamp black, yellow ochre, cadmium red, purple lake, and cadmium orange). This helps unite the illustration. I mixed up the black for the thorax and made sure there was plenty of purple and red in the mix (winsor blue, purple lake, vandyke brown, lamp black, alizarin crimson), again, this tricks the viewer into seeing the illustration as one entity instead of as disparate parts.
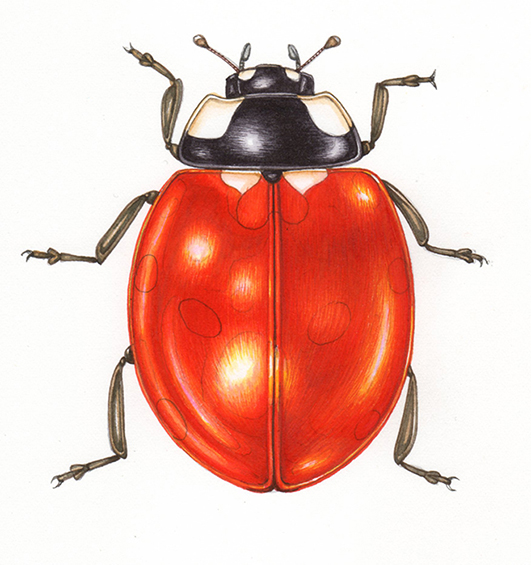
Right now, the ladybird looks quite odd – most of the detail is in, but it’s still lacking any spots.
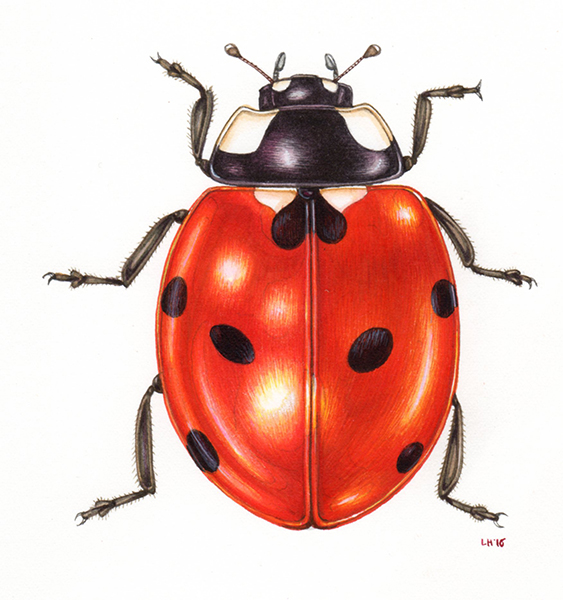
Adding the ladybird’s spots
Mixing up the black for the spots was nerve-racking as I had to compensate for the red substrate. I built them up with tiny brush strokes. I think the result is more convincing than when I left them until the rest of the body was done. However, there were issues with getting the shine to follow smoothly from areas of red to areas of black. I used white goauche mixed with the black to mend this. Laying down tiny strokes of this grey colour went some way to solvinng the problem.
I noticed at this point that there was more yellow hue on the right hand side of the wing cases. Unfortunately, trying to fix this at such a late stage would be unwise. I may have ended up with the black getting mixed into the red and adding a green tint to proceedings. Despite finidng this irritating, and the main thing I notice when I look at the illustration, I decided it wasn’t obvious or glaring enough to justify a re-paint from scratch. I’m hoping my client agrees.
Finishing up
The final step is to add the hairs on the legs, and to do final tweaks to the colours and shadows. I was pleased with the final illustration – it’s only little (about 20cm x 15cm) so there wasn’t enormous scope for intense detail (the larger you work the more detail you can include); but it progressed well and I managed to get it completed to my satisfaction in a day.
What I’ve not mentioned in this blog is anything about the life cycle of the ladybird. Ladybird’s diet, the different species we have here in the UK, how amazing they are…it’s all fascinating. It makes total sense that almost everyone loves ladybirds (except for aphids of course…) Another blog for another day, perhaps.
Beautiful work, and your passion shines through! Thanks for sharing your process.
My pleasure, Alana
Wow, this Ladybird Watercolour illustration is absolutely stunning! The level of detail and the vibrant colors bring the ladybird to life. I love how the step-by-step process allows us to appreciate the artist’s technique and skill. It’s inspiring to see the transformation from a blank canvas to such a beautiful work of art. Thank you for sharing this mesmerizing piece with us! 🐞🎨
Hi Lamar, thanks for this lovely comment, its great to know that my blog posts are so well received, I really appreciate it. Yours Lizzie
Great article! Loved the step-by-step guide for Ladybird watercolor illustration. Super helpful for beginners like me! 🎨🐞
Really glad you enjoyed it!