

Step by step Nasturtium illustration
I need to paint a nasturtium! We recently got the wonderful news that The Cultivated Forager (follow up to Adele Nozedar’s best-selling The Hedgerow Handbook) will be published, probably in late 2015.
Working on a list of illustrations
This means that I have to get painting; 49 garden plants to illustrate in the sketchbook studies style, which is to carry through both books. Although I’ve completed a good selection of plants to be included, there are lots which are about to finish flowering for the year, and which need doing. The beautiful nasturtium in one of these.
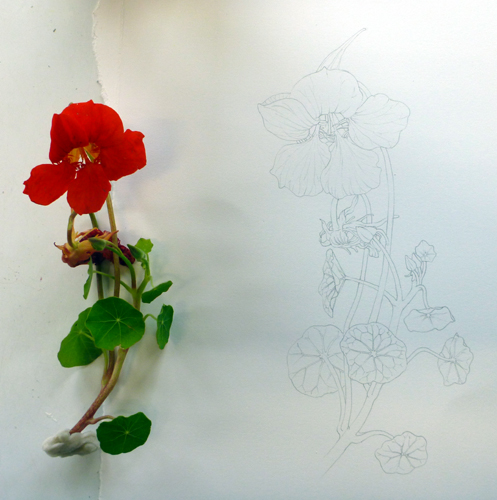
As with all these studies, the first thing I do is to draw the plant in pencil (I tend to use pentel P205 0.5mm automatic pencils), onto fabriano hot press paper. I try to choose an angle which shows the structures of the plant, as well as looking pretty compositionally.
Caring for the Nasturtium
I try to keep the plant fresh by holding a bit of wet tissue over the base of its stem, and popping it back in water at every available opportunity.
Painting the Nasturtium leaves
Next, I start painting the leaves. These are quite a yellow green (especially on younger leaves), and have distinctive venation of many round (or orbicular) leaves.
I use cadmium yellow light, sap green, a touch of yellow ochre, and a smidgen of cobalt blue. My paints are Winsor and Newton, as is my trusty brush; a number 1 series 7 sable.
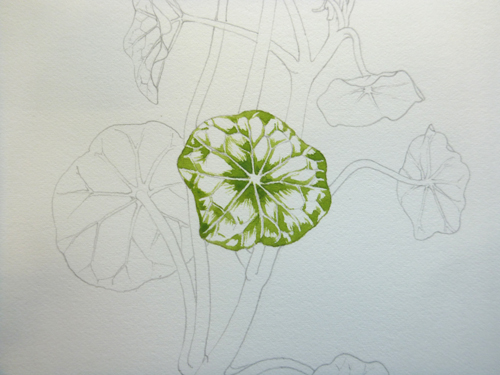
I plot in the darkest areas; then, as I wait for this to dry, I work into the pale sections of the stem, only using colour on the edges of the stem and allowing a wet wash to provide the paler tones of the body of the stem and the underside of the leaf. This is applied quite wet, and allowed to dry fully before I work further into the area.
Next, I plot in the mid-tones of the leaf using a more dilute, and slightly yellower mix. Once dry, I dilute this colour further, and add a little more yellow and apply this very wet paint across the entire leaf, including the veins (which, up to now, had been unpainted).

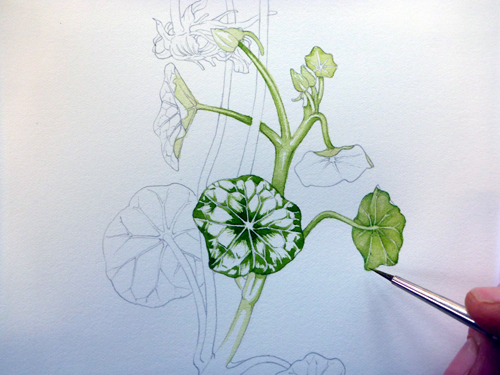
As this dries, I look at the stem and study the crimson flush. This is easy to do; straight crimson lake from the paint box and detailed work with a dry brush. Once this is dry, a much more dilute version of the same helps unify the markings onto the green background of the stem.
With cut plants, you can’t really afford to wait for paint to dry before continuing; you’re very much up against the clock and it’s horrid seeing your specimen beginning to wilt right in front of you. The only thing to do is to work on lots of different parts of the plant simultaneously.
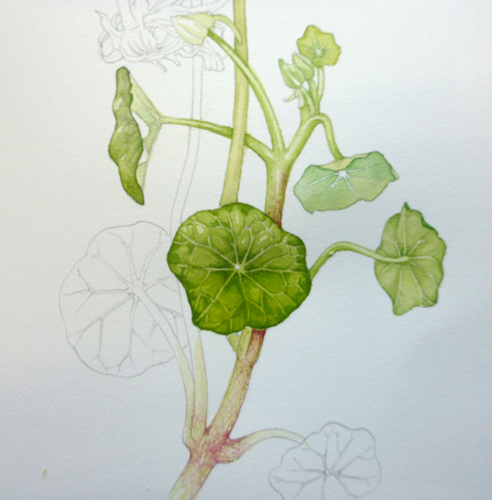
Finishing the leaves
The less detailed leaves are handled with a wet wash of cadmium yellow and cobalt blue. I apply this very wet. I love the way wet washes leave edges on the page, and wish I had the courage to use the paint more freely to exploit this effect more often.
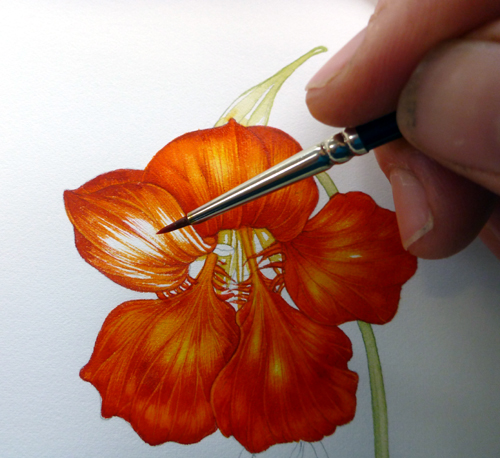
Painting the Nasturtium flower
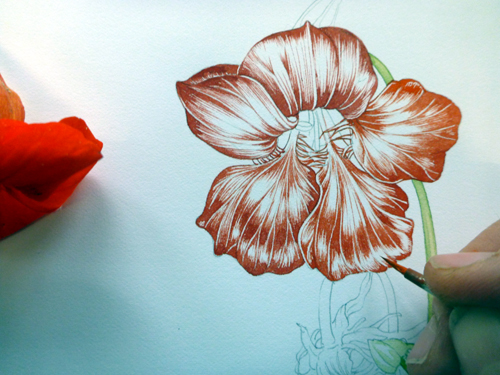
The fun part; painting the flower. Nasturtium colour are very varied, but this specimen was a ridiculously bright orange that I knew would be almost impossible to replicate in paint. To start with, I plot in the structure and base colour; a mix of cadmium orange light and cadmium orange dark, with a touch of a warm yellow. This paint goes on pretty solid and dry, and although it provides the main colour and form I think it’s vital to bear in mind the veins and details of the petals as you apply it.
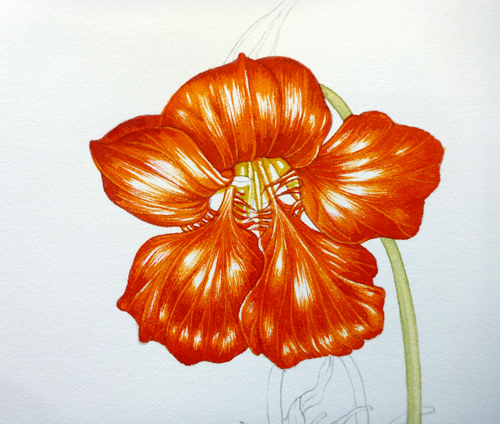
The next step is putting the orange mid-tones onto the petal, and painting the centre of the lower (a yellowish green). The mid-tones go on wetter than the first layer, and consists of the same initial colour, but mixed with Doctor Martin inks (orange and daffodil yellow in this case).
Finishing up the flower
Next, a dilute version of the mid-tones is applied to the entire flower. Remembering to try and keep it light on the areas which were white. Doctor Martin inks are fabulous for providing transparent, luminous colour. They’ve worked well on this flower.
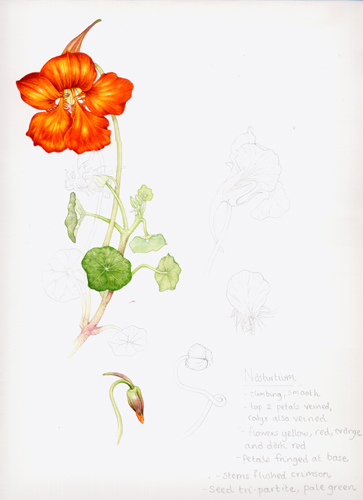
Here’s the final study. I chose to paint a bud since the flush on the calyx and the structure at the back of the flower were clear; I also drew the seed and some drawings of the fringing of the bottom two petals (which I dissected out).
These illustrations for The Cultivated Forager are also annotated, partly so I can remember salient points about the plant I’ve drawn, and partly so the designer can include these comments as and where he sees fit when it comes to designing the layout.
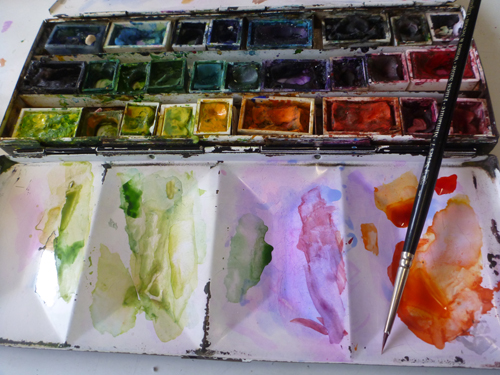
Here’s my paintbox at the end of the illustration of the nasturtium. The bright blobs in the far right palette are the famed Doctor Martin inks. This photo also shows what a splendid tip the series 7 brushes have; who could fail to do decent work with such tools?
I’m in a state of total panic as there are about 5 other plants about to go over, and two other commissions with imminent deadlines which also need to be done. Don’t get me wrong, I like my job, but anyone who thinks the life of a natural history illustrator is all gentle sketching couldn’t be more wrong! It’s deadlines, painting at midnight, and desperately trying to get a withering bloom to live for an extra 24 hours. And yes, I love it.
Please add me to your mailing list. Thank you for teaching us to paint! Gorgeous! I am on Fine Art America.
Dear Lizzie, you cant imagine what a help i’ve found by chance, has been to me. So generous from you to Share the truth of this painting. I wish to be in a mail list of you have one. Thanks a lot!
Hi Mercedes,
What a lovely comment, Im so pleased my blog helped!
Ive added yout o my mailing list which comes out three or four times a year.
Thanks so much for the comment and for your itnerest!
Yours, Lizzie
A very detailed but concise lesson. I look forward to giving your lovely flower a try.
Thank You!!
Hiya Joanne
Thanks for this. Its a bit of a long wait if youre looking to work from original material, though. But thank you, and hope you get the chance to do plenty of drawing and painting during these strange times.
I am doing botanical art classes ,not great at it ,but you have helped me so much ,thank you for sharing your skill
Hi Sue
That’s such a great thing to hear. Botanic illustration is dead tricky cause its about three things: knowing your plants, seeing things, then recording (or drawing/painting) them. It takes a while to build up the knowledge, and to get your eye in. No wonder you feel you;re not an expert quite yet! I think its wonderful that you’re doing it at all! And Im so pleased to be able to help.
Lizzie
The colors are beautiful, your detail, amazing!
Thank you Dot. The hydrous watercolour inks made my Dr Partin’s PH Colours really help add some zing to a picture.
I can really relate to your style as I paint similarly. I have painted in watercolours for over 30 years. But what I love about yur work is adding yellow highlights last so they pop. Have recently gone botanical as I previously filled the page with backgrounds etc. so detail is now more important.
Hi Julie
Oh how lovely to find a fellow backwards-to-frontwards watercolourist! Yeah, that top wash can really help bring it all together and diminish the chance of white spaces looking wishy-washy. I love that you’ve got into details, but am impressed that you’ve managed backgrounds too. My heart always sinks slightly when a commission comes in for something that isn’t cut-to-white. Cut to white is such a lovely space to get lost in the intricacies of plant anato,y. Thanks for the message!
Lizzie
I’m very much a novice with watercolour but absolutely loved your painting of the Nasturtium. You made it so easy to understand and I’m now keen to use the new box of watercolour paints my darling husband bought me for Xmas. I’ve just been holding off for the right project and this is it. Thank you for sharing your amazing talent.
Hi Eleanor,
Ah, a doting husband who buys you watercolours. Well thought, him! Yes, nasturtiums are a good subject as the flowers are bright and the leaves arent too tricky. I do hope you have fun trying to illustrate them, they’re definitely one of my favourites. x
Hi! I was looking for a Chinese ink painting of a nasturtium and found your blog. I really appreciate how you detail your techniques! Mixing my wc with my colored inks was something I had not thought of but I had bemoaned that ph Martin orange was too watery for rice paper on its own. I will be trying this!
Oooh exciting! Yes, the inks with watercolour not only gives a kick to watercolour, but you’re right. It subdues the inks too. Hope it works for you. X
So love your work and personality
Inspiring all round
Judith Victoria Australia
Aww, cheers for that, Judith. Thank you!
Thank you for sharing these detailed instructions.
I have seen another botanical artist (don’t remember who…) working from dark to light. Is this common practice in botanical illustrations or does it depend on the subject?
I am pretty new to watercolours and am trying to paint a nasturtium flower from one of my photos.
Hi Cecilia
The dark to light in botanical illustration isn’t common practice, and I’m glad to hear someone else does it. I always work this way, no matter what the subject as it feels intuitive to me. But mostly it is conventional to work from light to dark, and almost all of the established and excellent botanical illustrators out there all seem to work that way (if using watercolour). Still, I reckon using anything that works is good enough! Enjoy your nasturtium, they’re stunning flowers and I hope you enjoy painting yours. x
Well, I was so fascinated by that ‘other’ artist working from dark to light, that I faved the link quite some time ago. I knew it was somewhere, I only had to find it among my messy bookmarks.
Anyhow, I found the artist:
https://www.youtube.com/watch?v=8lWA4FQ-UcQ
:-))
A pleasure to watch and listen to.
Thank you so much for sharing online!
Hi again Cecilia, oh my, that is too funny! I was excited to think someone else worked back to front…but it was just me! You’ve certainly made me laugh, thank you. Cheers then, X Lizzie
I want to know that without shading
Hi Jude, lovely to hear from you. I’m not exactly sure what you’re after – information on how to do the drawing bit rather than the colour and shading? Or have I got the wrong end of the stick? its hard to explain how to do the drawing bit – its sort of just transferring the image from the eye to the paper via the hand. I never klnow quite how to break it down into bite size chunks. Also, I draw with a pale pencil, so even if I try to film it or take phtoos, they rarely show up! But thanks for the qiestio0n. Feel free to let me know if I’ve not answered you right. x
Hi Lizzie, I have being struggling to learn watercolor painting for some time, until I found you by chance. I tried to use the traditional light to dark method with partial success, your method of painting help me a lot, as well as your teaching style and tutorials, thank you so much for the generous details on how to approach a project, I welcome and learn also from your comments on plants. Please add me to your mailing list, would love to receive more. From Reno, USA, Thank you!
Hi Graciela
Thanks so much for so many kind and flattering comments! I absolutely love it when things I suggest work out for people, its lovely to be able to help folks as they learn more about seeing and recording the natural world. I just checked, and yovue subscribed to my Newsletter, so thank you for that, too! And good luck with all the art that you create. Thanks again for such a lovely message Yours, Lizzie
Does nasturtium has fruits? Okay, fine, I will draw nasturtium with shading
Hi Jude, yes. It ahs funny little fruits, made of three seeds. Heres a link to a really wierd video of them to jaunty music: https://youtu.be/NrLPGbZi3B0. Enjoy the nasturtium drawing!
Have watched several of your tutorials this week and appreciate your eye for detail. Covid has certainly allowed me to speed up my learning in the last months! Trying out your techniques.
Hi Trina, I know. Not many plus sides to Covid, but the extra time to expand into ones creativity has been one. I’m really glad you’re giving yourself the time to do this, and to experiment with different techniques. And yes, its a positive feedback loop isn’t it? the more you do the better you get…so you do more! And, as you say, get faster. Thanks for the comment. x
Thanks so much Lizzie for your blog on painting a Nasturtium … I’m working on a dissection and will refer to your notes. In the meantime, how do I go about adding my name to your mailing list?
Thanks.
Cheers
Susana Smith
Tasmania
Hi Susana
Im so glad the step by step helped. You may also, if you’re working on a dissection of a nasturtium, be interested in the splendid illustration by Arthur Harry Church: https://www.prints-online.com/natural-history-museum/tropaeolum-majus-nasturtium-8590151.html
I’ve added you to my newsletter, and actrually your timing is great! It only goes out three or four times a year, and one’s heading out into the wide world on friday! Hopefully itll pop into your inbox.
Glad to be of help
Yours
Lizzie
Hi Lizzie, I used to do botanical painting and haven’t done any for a long time but have been inspired by your paintings and I think a good place to start again will be nasturtiums! Please would you add me to your newsletter. Many thanks and look forward to your next demonstration.
Cheers for now,
Mel
Hi Mel
What a lovely message! Yes, start with a nasturtium and see how it goes! Im adding you to my newsletter mailing list now, many thanks! Yours
Lizzie