

Illustrating a Bumble bee
Bumble bee commission
I was commissioned to do a natural history illustration of a bumble bee for an interpretation board on flight. The client is Anglezarke Dixon Associates, for Yorkshire Dales National Park. They wanted a White tailed bumble bee (Bombus lucorum). This would accompany my scientific illustrations of the pipistrelle bat and peacock butterfly in flight. These were purchased for re-use from my online image library).
Bumble bee reference
As always, the first step is to assemble your reference. I use as wide of a range of reference as possible; this decreases the chance of “copying” mistakes, and helps show the main features to highlight. I also read up around my subjects so I know a little about them . There’s a lovely book on bumble bees I read recently, A Sting in the Tail by Dave Goulson, which I thought about as I drew.
There is a youtube video to accompany this blog, showing the steps involved:
The best bit of reference I have is a slightly battered white-tailed bumble bee. I pinned her onto a rubber and found myself referring to her constantly throughout the process. There’s nothing that beats having the actual plant or animal in front of you to draw from, and a treat to have my own specimen which I can examine and dissect out with impunity.
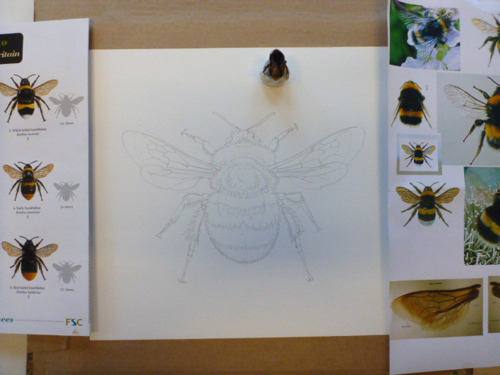
Drawing up the bumble bee and deciding where to start painting
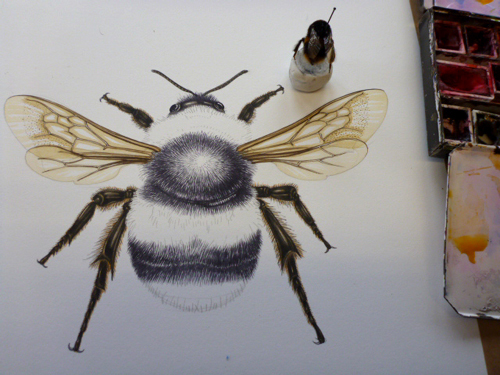
Since hymenoptera are more or less symmetrical (like most insects), you only need to draw up one side. Then you can flip and trace down the mirror image to complete your picture. Here is my pencil rough surrounded by my ref.
Painting the Bumble bee: Starting with blacks
I had a lot of trouble deciding how to start the bee; whether to work on yellow or black first. I decided on black, although intuitively painting black on top of yellow which is already in place makes more sense. My main objective with the colours was to avoid making the yellows greenish, which happens if black gets mixed into yellow.
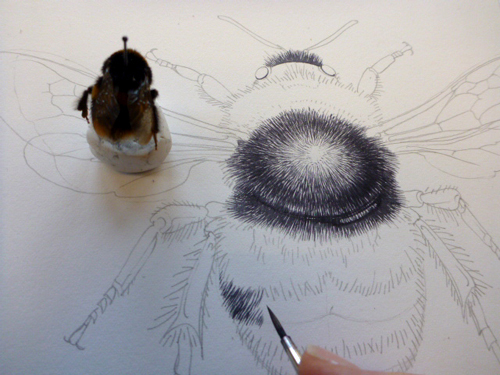
Using Winsor and Newton series 7 brush (size 1) and Winsor and Newton watercolour paints on fabriano artistico paper, I began building up a thicket of tiny black brush strokes.
Bumble bees are very fluffy, and I wanted to show this, so used various mixes of black to build up some depth and variety of tone. This initial black is a mix of vandyke brown and purple with a touch of indigo.
I also made sure to place the hairs in context; it may be hard to see the bumble bee’s underlying exoskeleton but that doesn’t mean it’s not there; I looked to see what parts of this were visible and could make out some abdominal segmentation, and the edge of the thorax.
Illustrating the legs
Working into the legs is easier; I dissected out the bee’s legs and took a close look as shape, segmentation, hairs, and colour. In fact, it was only after a second examination of the legs that I realised most of the hairs were golden brown rather than black. Once I made this change, the legs instantly looked more “correct”.
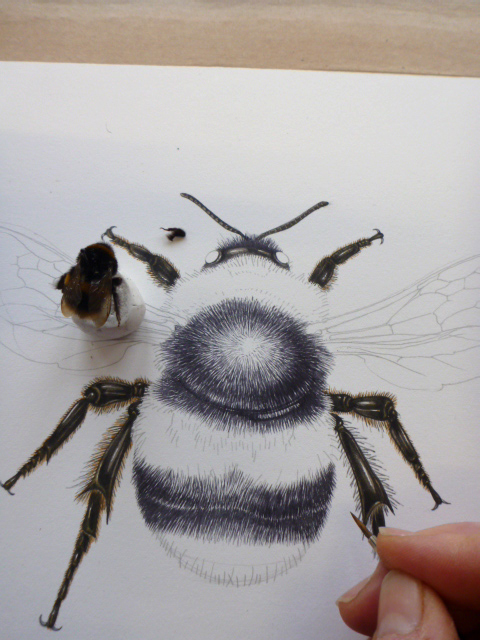
Illustrating the bumble bee head
I have a terror of doing eyes; it’s so easy to get them wrong which can compromise a whole painting. So I tried to get them done and out of the way. I also had a minor disaster with the antennae as I leaned on one when the paint was still wet and smudged it. Unfortunately, bumble bees have no long hairs on their antennae which could cover my mistake. It was a matter of working at the smear very slowly and carefully with a wet tissue rolled into a tiny point. I think I got away with it this time. (For more on fixing errors, check out my blog).
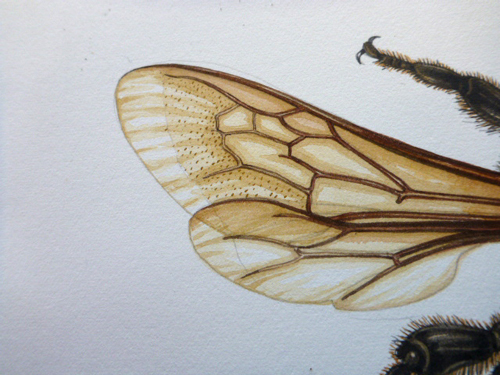
Bumble bee wings
Next, the wings. To get the venation correct I used diagrams of this species’ wings from the internet, coupled with my own specimen. Her wings were folded backwards rather than outstretched. The client specified outstretched or “spread-eagled” wings. Here wings were still useful, especially for colour and texture. The wings aren’t clear, but honey coloured, with regions of darker brown. the main veins are purplish brown. Plotting areas of shade around the network of veins, and edging the veins in van-dyke brown and purple was the first step.
The margins of the upper wings are stippled; this was quite tricky to do as each tiny spot was so small that even a size 000 paintbrush created marks a touch too large. Still, I managed to do an ok job. Yellow ochre mixed with cadmium orange light and a touch of yellow for these tiny dots.
To get the crinkly texture of the wing, I plotted in areas of shade, then worked into the centre of these with a slightly darker colour. You can see the mix I used for this on the edge of my paintbox in the photo above; yellow ochre, yellow, and orange; all applied as a very wet wash.
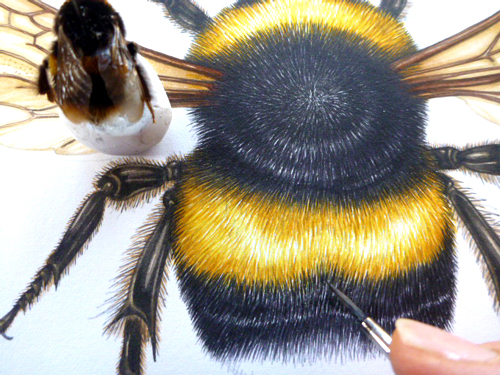
Painting the Bumble bee yellow stripes
Next came the yellow. Although bumble bees are considered bright yellow, when it comes to mixing the right shade, it doesn’t feel so straight forward. I wanted the areas of yellow in the light to be bright and clear, so went for cadmium yellow light. Mid tones were cadmium yellow dark mixed with yellow ochre. Darkest regions required the introduction of reddish browns. Although the yellows were getting there, the black regions were beginning to look flat and disconnected in comparison. Introducing more layers of different shades of black, and some glimmers of the yellow into the black areas evened it out a bit.

Painting the transition between black and yellow stripes
The transition between yellow and black as tough as I didn’t want to compromise the golden yellow by getting it dirty with black. But the two areas lie on top of each other. Getting the shape of the lines between the colours is important too. Lots of tiny strokes, and concentrating instead of just painting on auto pilot helped.
More and more work into the black makes the hairs look small, and the black regions look thick with colour and texture. This meant leaving paler areas within the black, but not so many that the fur seemed grey.
Painting the white tail of the Bumble bee
Finally, the white terminal abdominal segments needed doing. The shadows here are picked out with purples and cereulean blues, with a very washed down black for the darkest regions.
Final thoughts
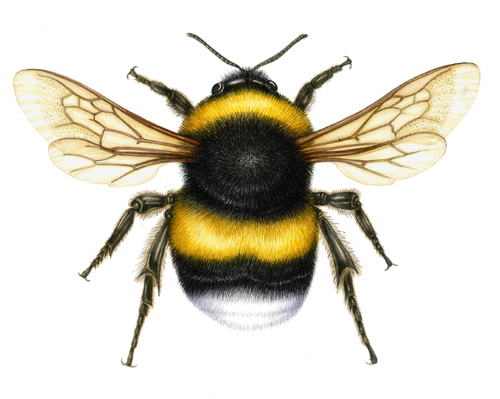
So this is the final bumble bee. Although I think it looks correct, somehow, for me, it hasn’t been entirely successful. I think this illustration shows the bumble bee as too neat, without any of the life and verve that the insects have in the wild. It’s as if someone’s combed her hair, and she seems far smoother than in reality. However, having said that, I also think it could only be a white-tailed bumble bee, and am pretty happy with the way the wings worked out.
I read somewhere that in the medieval courts of Europe, if someone wanted to be a court illustrator (illuminating psalm books and psalters) one of the common tests was to ask for an illustration on a bumble bee. I think it makes sense; getting bumble bees just right is a very tough call, and I’m not entirely convinced I would have been hired on the strength of this one, although hope I might have stood a chance…
This is awesome the amount of work you put into it.
Especially the detail in explaining the process.
I loved it.. keep it up!
Hi Kwame
Thanks so much! I’m really glad you enjoyed me explaining what goes into painting these things. It’s funny though, as you get used to illustrating it all becomes faster and more fluid, so it never feels like a trial. Thanks for taking the time to leave a comment! Yours Lizzie
A very beautiful and well done illustration. The only thing I donʼt understand is why it looks like the middle and rear feet are coming out of the bottom part of the bee. All legs come out of the middle thorax section. I have not watched the video yet so maybe you explain where the legs go in it.
Hi Jan
Thanks for this. Youre totally right about the legs. They all come from the thorax, as with all insects. With some insects the back legs are longer than the front ones. So the legs might look like they come from the abdomen. Ill take another look, it could also easily be an error in my drawing, although hopefully only the keen-eyed would notice! Thanks Jan Yours Lizzie
This was a really helpful walkthrough, thank you! And very impressed with the final result & level of detail!
I wonder if some of that “too neat” sensibility is due to the exact symmetry? (I know it’s essentially doubling the labour to do both sides individually, which isn’t always possible depending on circumstance of the work!). In any case it’s a great resource and very soothing to look at!
Hi Jey, Good thinking, you may well be right. Glad you found the blog useful