

Natural History Illustration: Lansdscape
Natural History illustration needs landscape painting skills
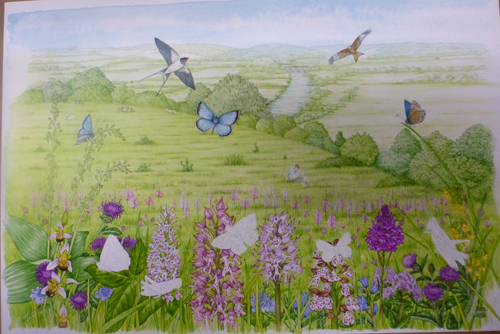
Natural history illustration incorporates a wide range of techniques. I realised about ten years ago that a desirable type of of natural science illustration was one that incorporated numerous species of plant and animal into one landscape. This wetland landscape done for Natural England is an example.

Working on a new landscape Illustration: Hartslock nature reserve
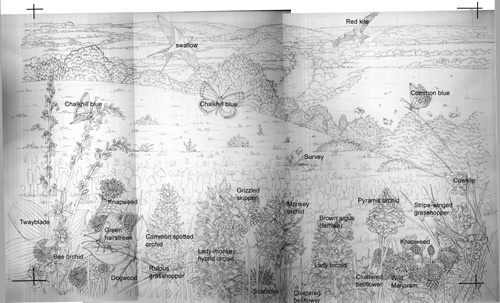
Recently I’ve been commissioned by Berkshire, Buckinghamshire and Oxon Wildlife Trust (BBOWT) to create a landscape of one of their reserves. Hartslock reserve has a glorious hill in it which is blousy with seven different species of orchid. This includes the hybrid lady-monkey orchid which is found nowhere else in the UK.
These seven orchid species need to be incorporated into a scene of the hill. Other key species of animals also need to be included. The chalkhill-blue butterfly, grizzled skipper, white-stripe grasshopper and brown argus are found on Hartslock hill. Other plants to include are the knapweed, the field scabious, wild marjoram, cowslip, and clustered bell-flower. BBOWT are lovely to work for as they provide me with really good reference.
Working up the composition of the landscape
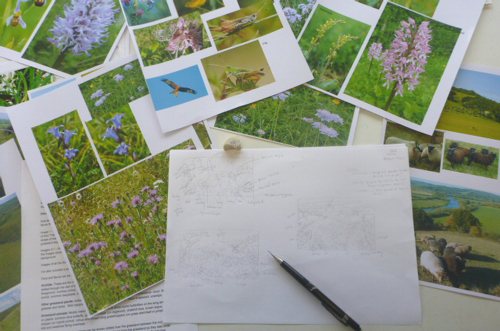
In an ideal world, I’d be able to go and sketch all the elements. This job came in in February when there’s not so much as a hint of an orchid in sight. So, I rely on photographic reference and illustrations by other botanical artists.
First step is to try and visualise the illustration. Piecing together all the different components into one coherent landscapecan take a while. I normally produce about 6 different approaches before settling on two that I work on further. As I do this I tend to come up with questions that need clarifying. These get noted down on the sheet so I remember to email them to the client later on.
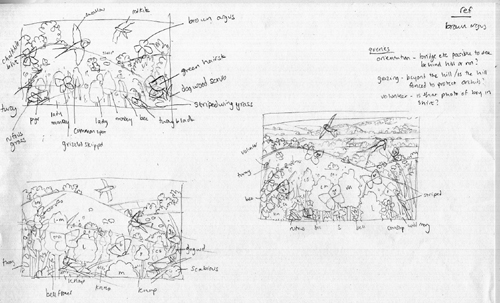
Next, I draw up thumbnail sketches (very rough ideas) of a couple of options. These are always rough, but are clear enough for the client to see and understand. Here, the main difference between the two is the landscape (included or not) and the viewpoint of the orchids. In one option you’re right up amongst them, in the other there’s enough distance so you can see the entire plant. They are annotated so the client can see what you’re suggesting goes where. (It also means I can remember what species is what!)
Landscape pencil roughs and drawing up the final piece
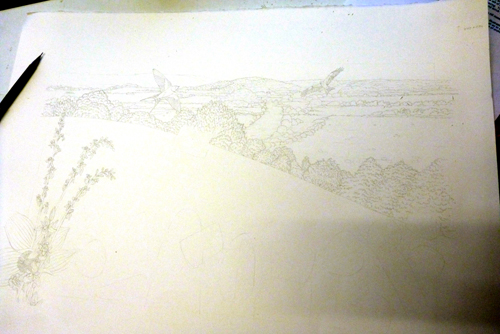
I was really happy that they decided they preferred the second one, with the landscape. It makes for a far prettier illustration, and it means there’s less of a big expanse of hill to “colour in”.
Next step is to draw the actual rough up in detail. First, I draw the landscape in. I keep the pencil lines light as I plan not to rub them out at the end; they give some substance to the illustration. Then I put extremely faint markings on the page which suggest, in blocks, where the different animals and plants should go.
Next, I draw up the animal species. Sometimes using a projector can help with this, as you need to shrink and enlarge the butterflies and grasshoppers to fit into their space in the landscape.
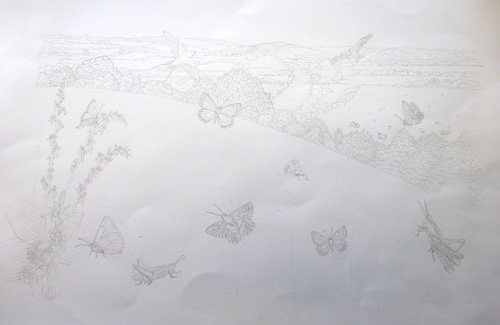
Then I draw in the plants. In this case drawing up all the orchids, and ensuring their accuracy, took a long time. Once foreground and background are complete, I put in the middle-ground; the suggestion of distant flowers and orchids, and a bit of scrub, across the hill. Then I scan it in, stitch it together (the illustration is far larger than my A4 flat bed scanner), adjust the darks and lights so the pencil is clear, and then produce an annotated version for the client. They get the annotated and unnanotated version emailed to them. The next (nail-biting) stage is to wait for feedback, and to see what needs changing before going to final.
Starting out: A pale background for the landscape
Once the alterations are complete, it’s time to break out the paints. I use a very pale blueish wash across everything but the immediate foreground to start, and make it bolder in the sky.
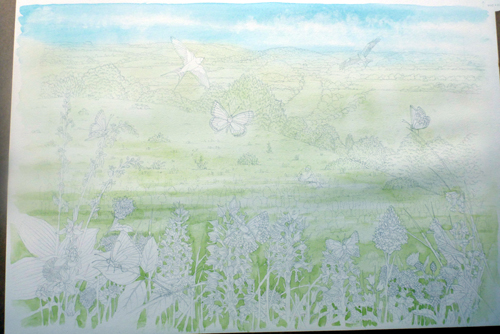
Then I work into the background, again using incredibly pale paints to give a sense of distance. Less seems to be more when it comes to painting landscape, so often I’ll suggest an area of scrub, or a building, rather than paint it in detail.
Illustrating the middle ground of the landscape
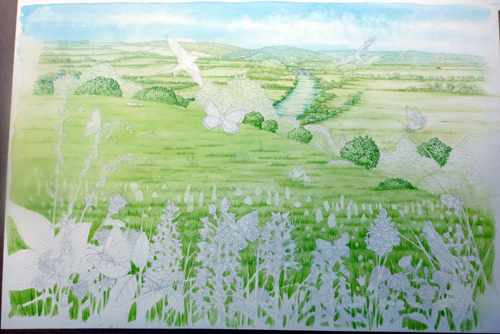
Once the background is done, Ill move forward into the middle-ground. This takes a little longer than the background as all the trees and grass need to be textured. Paint colours remain pale, although somewhat stronger then they were for the background. Using a certain amount of “wet-on-wet” is useful here, a way to suggest the turrets of distant orchids without having to paint each and every bloom. The volunteer surveying the orchids is plotted in, and as you progress to the foreground there’s increasingly more colour and detail.
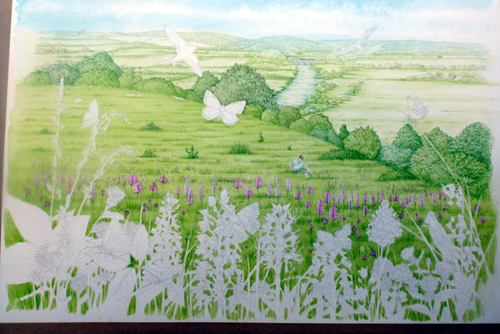
At this stage, the painting looks like a child’s jigsaw; all the background complete, but the key species still waiting to be slotted in. This is my favourite part of these types of painting (click for more examples of my composite landscapes); losing yourself in the intricate detail of each individual plant or animal.
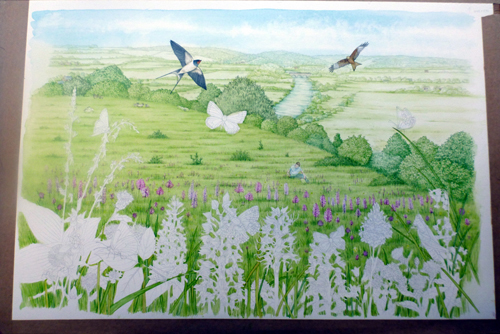
Painting in the animals and individual plants
It can take ages, but with each successive species painted you feel happier and happier with the painting.
Finally, it’s time to rub out some of the more prominent pencil lines, and to cover the background with a light yellow ochre wash. This unites the background, and brings the foreground into sharp focus. Final tweaks, mostly involving sharpening areas with shadow, and it’s complete.
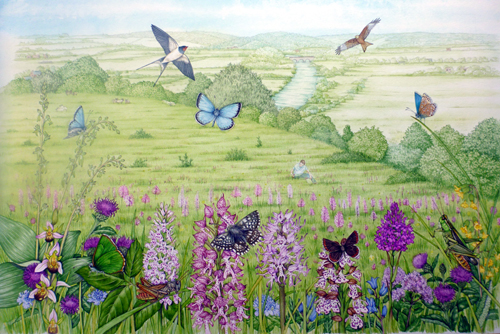
And one of the best things about this job is that the client has said they really like it! Wonderful news, and a fabulous job to work on.
Below is a time lapse video of the landscape being painted (apologies for my hair!)